Let’s get a quick overview of Google Kubernetes Engine from an GCP certification perspective. We will look at important certification questions regarding GKE, various concepts like Deployment, Replicaset including various commands
You will learn
- What is GKE?
- What are the different concepts, components and important terminologies
- Commands Cheatsheet
Google Kubernetes Engine (GKE)
Kubernetes

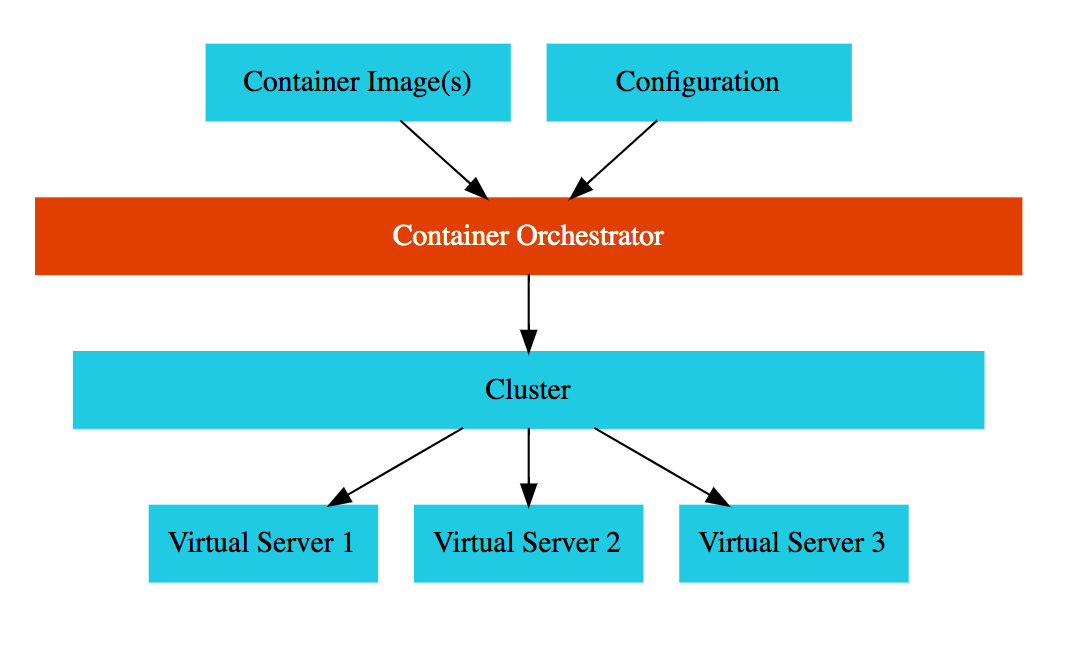
- Most popular open source container orchestration solution
- Provides Cluster Management (including upgrades)
- Each cluster can have different types of virtual machines
- Provides all important container orchestration features:
- Auto Scaling
- Service Discovery
- Load Balancer
- Self Healing
- Zero Downtime Deployments
Google Kubernetes Engine (GKE)
![]()
- Managed Kubernetes service
- Minimize operations with auto-repair (repair failed nodes) and auto-upgrade (use latest version of K8S always) features
- Provides Pod and Cluster Autoscaling
- Enable Cloud Logging and Cloud Monitoring with simple configuration
- Uses Container-Optimized OS, a hardened OS built by Google
- Provides support for Persistent disks and Local SSD
Google Kubernetes Engine (GKE) Cluster

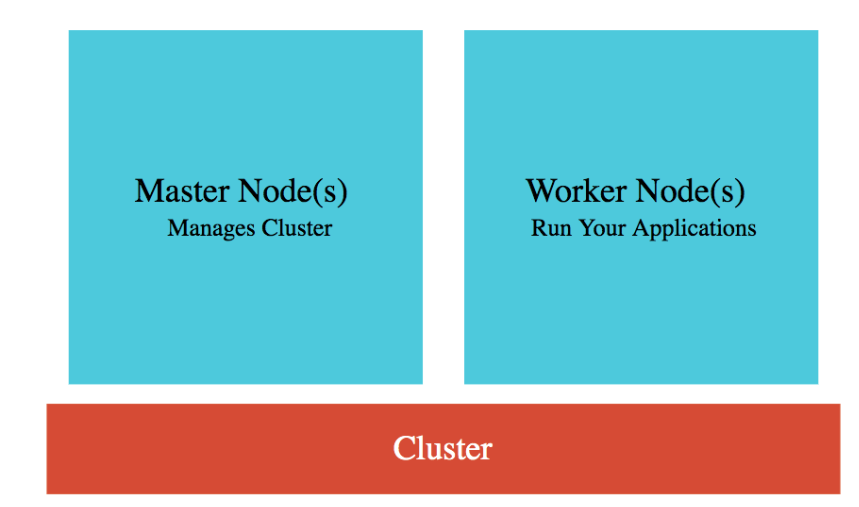
- Cluster : Group of Compute Engine instances:
- Master Node(s) - Manages the cluster
- Worker Node(s) - Run your workloads (pods)
- Master Node (Control plane) components:
- API Server - Handles all communication for a K8S cluster (from nodes and outside)
- Scheduler - Decides placement of pods
- Control Manager - Manages deployments & replicasets
- etcd - Distributed database storing the cluster state
- Worker Node components:
- Runs your pods
- Kubelet - Manages communication with master node(s)
GKE Cluster Types
![]()
| Type | Description |
|---|---|
| Zonal Cluster | Single Zone - Single Control plane. Nodes running in the same zone. |
| Multi-zonal - Single Control plane but nodes running in multiple zones | |
| Regional cluster | Replicas of the control plane runs in multiple zones of a given region. Nodes also run in same zones where control plane runs. |
| Private cluster | VPC-native cluster. Nodes only have internal IP addresses. |
| Alpha cluster | Clusters with alpha APIs - early feature API’s. Used to test new K8S features. |
Kubernetes - Pods

- Smallest deployable unit in Kubernetes
- A Pod contains one or more containers
- Each Pod is assigned an ephemeral IP address
- All containers in a pod share:
- Network
- Storage
- IP Address
- Ports and
- Volumes (Shared persistent disks)
- POD statuses : Running /Pending /Succeeded /Failed /Unknown
Kubernetes - Deployment vs Replica Set

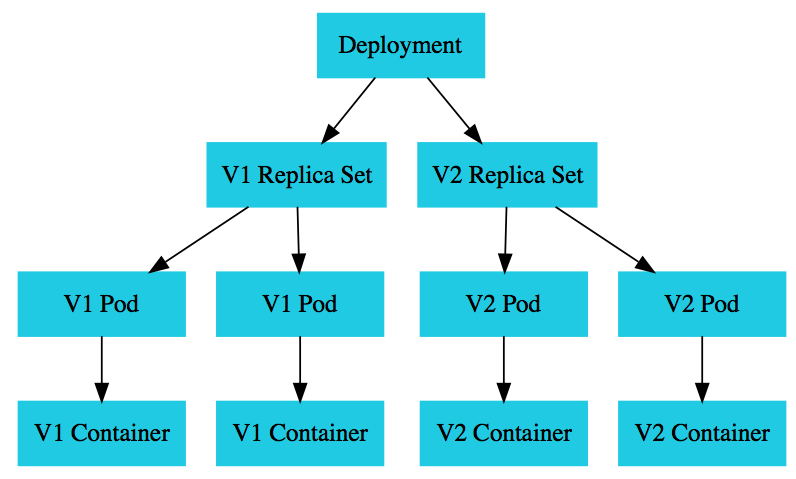
- A deployment is created for each microservice:
kubectl create deployment m1 --image=m1:v1- Deployment represents a microservice (with all its releases)
- Deployment manages new releases ensuring zero downtime
- Replica set ensures that a specific number of pods are running for a specific microservice version
kubectl scale deployment m2 --replicas=2- Even if one of the pods is killed, replica set will launch a new one
- Deploy V2 of microservice - Creates a new replica set
kubectl set image deployment m1 m1=m1:v2- V2 Replica Set is created
- Deployment updates V1 Replica Set and V2 Replica Set based on the release strategies
Kubernetes - Service
- Each Pod has its own IP address:
- How do you ensure that external users are not impacted when:
- A pod fails and is replaced by replica set
- A new release happens and all existing pods of old release are replaced by ones of new release
- How do you ensure that external users are not impacted when:
- Create Service
- kubectl expose deployment name –type=LoadBalancer –port=80
- Expose PODs to outside world using a stable IP Address
- Ensures that the external world does not get impacted as pods go down and come up
- kubectl expose deployment name –type=LoadBalancer –port=80
- Three Types:
- ClusterIP: Exposes Service on a cluster-internal IP
- Use case: You want your microservice only to be available inside the cluster (Intra cluster communication)
- LoadBalancer: Exposes Service externally using a cloud provider’s load balancer
- Use case: You want to create individual Load Balancer’s for each microservice
- NodePort: Exposes Service on each Node’s IP at a static port (the NodePort)
- Use case: You DO not want to create an external Load Balancer for each microservice (You can create one Ingress component to load balance multiple microservices)
- ClusterIP: Exposes Service on a cluster-internal IP
Container Registry - Image Repository

- You’ve created docker images for your microservices:
- Where do you store them?
- Container Registry - fully-managed container registry provided by GCP
- (Alternative) Docker Hub
- Can be integrated to CI/CD tools to publish images to registry
- You can secure your container images. Analyze for vulnerabilities and enforce deployment policies.
- Naming: HostName/ProjectID/Image:Tag - gcr.io/projectname/helloworld:1
GKE - Remember
- Replicate master nodes across multiple zones for high availability
- (REMEMBER) Some CPU on the nodes is reserved by Control Plane:
- 1st core - 6%, 2nd core - 1%, 3rd/4th - 0.5, Rest - 0.25
- Creating Docker Image for your microservices(Dockerfile):
- Build Image: *docker build -t in28min/hello-world-rest-api:0.0.1.RELEASE . *
- Test it Locally: docker run -d -p 8080:8080 in28min/hello-world-rest-api:0.0.1.RELEASE
- Push it to Container Repository: docker push in28min/hello-world-rest-api:0.0.1.RELEASE
- Kubernetes supports Stateful deployments like Kafka, Redis, ZooKeeper:
- StatefulSet - Set of Pods with unique, persistent identities and stable hostnames
- How do we run services on nodes for log collection or monitoring?
- DaemonSet - One pod on every node! (for background services)
- (Enabled by default) Integrates with Cloud Monitoring and Cloud Logging
- Cloud Logging System and Application Logs can be exported to Big Query or Pub/Sub
Kubernetes - A Microservice Journey - Getting Started
![]()
- Commands cheatsheet to create a cluster, deploy a microservice and play with it in 13 steps!
- 1: Create a Kubernetes cluster with the default node pool
- gcloud container clusters create or use cloud console
- 2: Login to Cloud Shell
- 3: Connect to the Kubernetes Cluster
- gcloud container clusters get-credentials my-cluster –zone us-central1-a –project solid-course-258105
Kubernetes - A Microservice Journey - Deploy Microservice
![]()
- 4: Deploy Microservice to Kubernetes:
- Create deployment & service using kubectl commands
- kubectl create deployment hello-world-rest-api –image=in28min/hello-world-rest-api:0.0.1.RELEASE
- kubectl expose deployment hello-world-rest-api –type=LoadBalancer –port=8080
- Create deployment & service using kubectl commands
- 5: Increase number of instances of your microservice:
- kubectl scale deployment hello-world-rest-api –replicas=2
- 6: Increase number of nodes in your Kubernetes cluster:
- gcloud container clusters resize** my-cluster –node-pool my-node-pool –num-nodes 5**
-
You are NOT happy about manually increasing number of instances and nodes!
Kubernetes - A Microservice Journey - Auto Scaling and ..

- 7: Setup auto scaling for your microservice:
- kubectl autoscale deployment hello-world-rest-api –max=10 –cpu-percent=70
- Also called horizontal pod autoscaling - HPA - kubectl get hpa
- kubectl autoscale deployment hello-world-rest-api –max=10 –cpu-percent=70
- 8: Setup auto scaling for your Kubernetes Cluster
- gcloud container clusters update cluster-name –enable-autoscaling –min-nodes=1 –max-nodes=10
- 9: Add some application configuration for your microservice
- Config Map - kubectl create configmap todo-web-application-config –from-literal=RDS_DB_NAME=todos
- 10: Add password configuration for your microservice
- Kubernetes Secrets - kubectl create secret generic todo-web-application-secrets-1 –from-literal=RDS_PASSWORD=dummytodos
Kubernetes Deployment YAML - Deployment
apiVersion: apps/v1
kind: Deployment
metadata:
  labels:
    app: hello-world-rest-api
  name: hello-world-rest-api
  namespace: default
spec:
  replicas: 3
  selector:
    matchLabels:
      app: hello-world-rest-api
  template:
    metadata:
      labels:
        app: hello-world-rest-api
    spec:
      containers:
      - image: in28min/hello-world-rest-api:0.0.3.RELEASE
        name: hello-world-rest-api
Kubernetes Deployment YAML - Service
apiVersion: v1
kind: Service
metadata:
  labels:
    app: hello-world-rest-api
  name: hello-world-rest-api
  namespace: default
spec:
  ports:
  - port: 8080
    protocol: TCP
    targetPort: 8080
  selector:
    app: hello-world-rest-api
  sessionAffinity: None
  type: LoadBalancer
Kubernetes - A Microservice Journey - The End!
![]()
- 11: Deploy a new microservice which needs nodes with a GPU attached
- Attach a new node pool with GPU instances to your cluster
- gcloud container node-pools create POOL_NAME –cluster CLUSTER_NAME
- gcloud container node-pools list –cluster CLUSTER_NAME
- Deploy the new microservice to the new pool by setting up
nodeSelectorin thedeployment.yaml- nodeSelector: cloud.google.com/gke-nodepool: POOL_NAME
- Attach a new node pool with GPU instances to your cluster
- 12: Delete the Microservices
- Delete service - kubectl delete service
- Delete deployment - kubectl delete deployment
- 13: Delete the Cluster
- gcloud container clusters delete
GKE - Cluster Management - Command Line
| Description | Command |
|---|---|
| Create Cluster | gcloud container clusters create my-cluster –zone us-central1-a –node-locations us-central1-c,us-central1-b |
| Resize Cluster | gcloud container clusters resize my-cluster –node-pool my-node-pool –num-nodes 10 |
| Autoscale Cluster | gcloud container clusters update cluster-name –enable-autoscaling –min-nodes=1 –max-nodes=10 |
| Delete Cluster | gcloud container clusters delete my-cluster |
| Adding Node Pool | gcloud container node-pools create new-node-pool-name –cluster my-cluster |
| List Images | gcloud container images list |
GKE - Workload Management - Command Line
| Description | Command |
|---|---|
| List Pods/Service/Replica Sets | kubectl get pods/services/replicasets |
| Create Deployment | kubectl apply -f deployment.yaml or kubectl create deployment |
| Create Service | kubectl expose deployment hello-world-rest-api –type=LoadBalancer –port=8080 |
| Scale Deployment | kubectl scale deployment hello-world –replicas 5 |
| Autoscale Deployment | kubectl autoscale deployment –max –min –cpu-percent |
| Delete Deployment | kubectl delete deployment hello-world |
| Update Deployment | kubectl apply -f deployment.yaml |
| Rollback Deployment | kubectl rollout undo deployment hello-world –to-revision=1 |
Google Kubernetes Engine - Scenarios - 1
| Scenario | Solution |
|---|---|
| You want to keep your costs low and optimize your GKE implementation | Consider Preemptible VMs, Appropriate region, Committed-use discounts. E2 machine types are cheaper than N1. Choose right environment to fit your workload type (Use multiple node pools if needed). |
| You want an efficient, completely auto scaling GKE solution | Configure Horizontal Pod Autoscaler for deployments and Cluster Autoscaler for node pools |
| You want to execute untrusted third-party code in Kubernetes Cluster | Create a new node pool with GKE Sandbox. Deploy untrused code to Sandbox node pool. |
Google Kubernetes Engine - Scenarios - 2
| Scenario | Solution |
|---|---|
| You want enable ONLY internal communication between your microservice deployments in a Kubernetes Cluster | Create Service of type ClusterIP |
| My pod stays pending | Most probably Pod cannot be scheduled onto a node(insufficient resources) |
| My pod stays waiting | Most probably failure to pull the image |